Main Courses
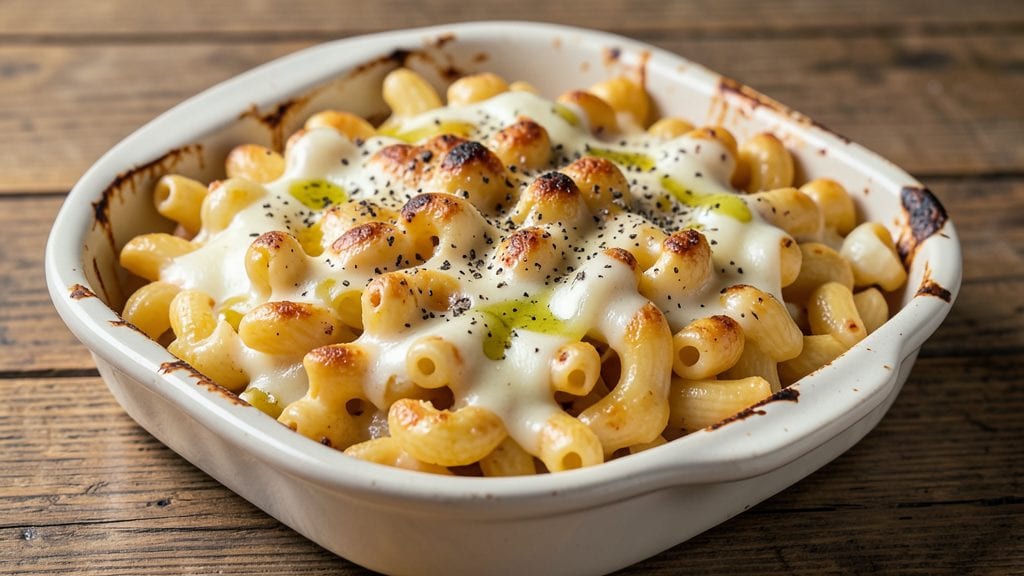
This old-fashioned baked mac and cheese recipe delivers the nostalgic comfort of childhood dinners with crispy golden edges and gooey cheese swirls that pull apart perfectly. The secret lies in a proper roux and slow simmering—no shortcuts here, just the classic method that makes every bite worth the effort.
I’ve perfected this version over years of testing, ensuring the cheese stays velvety while the top develops that satisfying crunch.
The foundation begins with elbow macaroni cooked just shy of al dente, then tossed in a rich cheese sauce made from sharp cheddar, Gruyère, and a touch of cream cheese for depth. A buttery breadcrumb topping seals in the moisture while creating that crispy contrast.
This recipe balances tradition with modern techniques—like pre-cooking the pasta in salted water and assembling everything in a single baking dish for easy cleanup.
What you’ll end up with is a bubbly, golden mac and cheese that’s crisp on top, creamy inside, and packed with that unmistakable cheesy flavor. The breadcrumbs add texture, while the cheese sauce clings to every noodle.
It’s the kind of dish that feels like a hug in food form—reminiscent of Sunday dinners but elevated with professional results.
Serve with steamed green beans or a simple salad for a complete meal. The leftovers reheat beautifully, making this the ultimate foolproof recipe for family gatherings or cozy weeknight dinners. Let’s get started on this timeless classic!
Ingredients for old fashioned baked mac n cheese
Sixteen essential ingredients transform into nostalgic, bubbly mac and cheese with perfect crispy edges.
| Ingredient | Amount | Notes |
|---|---|---|
| Elbow Macaroni 🍝 | 1 ½ lbs | Dry weight, cooked al dente |
| Sharp White Cheddar Cheese 🧀 | 2 cups | Freshly shredded, block preferred |
| Gruyère Cheese 🧀 | 1 cup | Aged 12+ months for depth |
| Cream Cheese 🧈 | 8 oz | Full-fat for creaminess |
| Unsalted Butter 🧈 | ½ cup | Cold, cubed for roux |
| All-Purpose Flour 🌾 | ¼ cup | Wondra preferred for smooth sauce |
| Whole Milk 🥛 | 2 cups | Room temperature for best emulsion |
| Heavy Cream 🥛 | ¼ cup | 36% fat for richness |
| Yellow Mustard 🌶️ | 1 tbsp | Dijon for subtle tang |
| Diamond Crystal Kosher Salt 🧂 | 1 ½ tsp | For pasta water and seasoning |
| Ground Black Pepper 🌶️ | ½ tsp | Freshly cracked for heat |
| Panko Breadcrumbs 🍞 | ½ cup | Toasted for extra crunch |
| Extra-Virgin Olive Oil 🫒 | 1 tbsp | For breadcrumb topping |
| Garlic Powder 🧄 | ½ tsp | For breadcrumb seasoning |
The cheese selection is non-negotiable. Sharp white cheddar provides the signature tang, while aged Gruyère (12+ months) adds nutty depth—Whittard of Chelsea or Murray's are reliable sources. For cream cheese, Philadelphia Original delivers consistent quality without artificial additives. The butter should be European-style (82% fat) if available, but standard unsalted works perfectly. All cheeses must be freshly shredded; pre-shredded contains anti-caking agents that prevent proper melting. Store cheeses in airtight containers with parchment paper between slices to maintain moisture.
Substitutions require careful consideration. Pepper Jack can replace 1 cup of cheddar for heat, while Parmesan adds umami but should comprise no more than 25% of the blend. For dairy-free adaptations, Miyoko's cream cheese and Kite Hill almond milk work well, though texture will differ. The flour can be swapped for gluten-free all-purpose blend at a 1:1 ratio, but expect slightly thicker sauce. Mustard is optional but recommended—its acidity balances the richness. When prepping, toast the breadcrumbs in a dry pan for 2-3 minutes before mixing with olive oil and garlic powder for enhanced flavor development.
This dish reheats beautifully when properly stored. Assemble the mac and cheese in a 9x13-inch baking dish and refrigerate uncovered for up to 24 hours to allow flavors to meld. For longer storage, cover tightly with foil and refrigerate for 3-4 days or freeze for up to 3 months. To reheat, cover with foil and bake at 375°F (190°C) for 20-25 minutes until bubbly. The crispy topping will soften slightly but can be restored with 2-3 minutes under a broiler post-reheating. Portion into individual containers for meal prep, reserving the breadcrumb topping for fresh application before serving.
Why You'll Love This Recipe
- No-Fuss Assembly: I swear by this one-pot method—just boil the elbows, melt the butter, and stir in the cheeses until it’s velvety. No straining, no extra bowls, and honestly? That’s half the battle won.
- Triple-Cheese Magic: Sharp cheddar’s tang cuts through Gruyère’s nutty depth, while cream cheese ties it all together with that signature creamy pull. (Yes, even on a Tuesday night, this feels fancy.)
- Lunchbox Legend: Between us, this reheats like a dream—crispy top, gooey middle—so I make a double batch every Sunday. Kids grab it for school, and I sneak seconds for my own.
- Budget Stretch: A single block of cheddar and a bag of elbows stretch to feed four for under $10. That’s a win when you’re balancing groceries and takeout cravings. (Trust me, it’s my go-to.)
Step-by-step instructions for old fashioned baked mac and cheese
Here's the method for achieving that legendary bubbly cheese swirl and golden crust you crave.
Cook the Elbow Macaroni to Al Dente Perfection
Bring a large pot of water to a rolling boil and add the 1.5 lbs elbow macaroni. Season generously with 1.5 tsp diamond crystal kosher salt—it should taste like seawater. Cook until al dente, which is about 1 minute less than the package instructions suggest. You want the pasta to have a slight bite when you test it with your teeth.
Drain the pasta in a colander, but don't rinse it. The starch on the surface helps create that velvety sauce later. Transfer the drained pasta to a large mixing bowl and set aside. I like to give it a quick toss with tongs to break up any clumps before adding the cheese mixture.
Create the Ultimate Cheese Sauce with Proper Technique
In a separate large skillet, melt the 0.5 cup unsalted butter over medium heat. Once melted, whisk in the 0.25 cup all-purpose flour to create a roux. Cook for 2-3 minutes, stirring constantly, until it turns a light golden color and has a nutty aroma. This is your flavor foundation.
Gradually whisk in the 2 cups whole milk and 0.25 cup heavy cream, allowing each addition to fully incorporate before adding more. The mixture should thicken noticeably as it comes to a gentle simmer. Remove from heat and stir in the 2 cups sharp white cheddar cheese, 1 cup gruyère cheese, and 8 oz cream cheese until completely melted and smooth. Add the 1 tbsp yellow mustard and 0.5 tsp ground black pepper, mixing until well combined.
Combine Pasta and Cheese for Maximum Cheesiness
Pour the hot cheese sauce over the cooked elbow macaroni in the mixing bowl. Using a wooden spoon or rubber spatula, gently fold everything together until the pasta is evenly coated and the mixture reaches 160°F internally. This temperature ensures the cheese is fully melted without curdling. The sauce should be thick enough to coat the back of your spoon but still have a slight sheen.
For that classic "bubbly" texture, I like to add a bit of technique here: Once combined, transfer the mixture to a greased 9x13-inch baking dish. Use a rubber spatula to create swirls in the top layer, dragging the spatula through the cheese mixture in circular motions. This creates those signature cheese swirls when it bakes.
Prepare the Crispy Breadcrumb Topping
In a small bowl, combine the 0.5 cup panko breadcrumbs, 0.5 tsp garlic powder, and 1 tbsp extra-virgin olive oil. Mix well until the breadcrumbs are evenly coated with oil. This topping is what gives your mac and cheese that coveted crispy crust. Spread the breadcrumb mixture evenly over the top of the mac and cheese, pressing down gently to ensure good contact.
Here's the thing—don't skip the pressing step. I've found that simply sprinkling the breadcrumbs leads to uneven browning. Pressing ensures the entire surface makes contact with the hot baking dish, creating that perfect crispy layer on every bite.
Bake to Golden Perfection with Proper Timing
Preheat your oven to 375°F while you prepare the mac and cheese. Place the baking dish on the middle rack and bake for 25-30 minutes. The dish is done when the top is deep golden brown with visible bubbles throughout the cheese and the edges are crispy to the touch.
Watch carefully in the last 5 minutes—overbaking can turn that perfect bubbly texture into something dry. If the top browns too quickly, tent loosely with aluminum foil. The internal temperature should reach 170°F at its thickest point. Let it rest for 10-15 minutes before serving—this allows the cheese to set slightly and makes slicing much easier.
Pro Tips For Making Old Fashioned Baked Mac N Cheese
- Preheat for 15 Minutes: Your oven needs to be hot—425°F (220°C)—and ready before the mac goes in. I learned this the hard way when my first batch turned out soggy because the oven took too long to heat up. That extra time isn’t just for the crust; it’s for even baking so the edges don’t burn while the center stays creamy.
- Grate Cheese Fresh: Pre-shredded cheese has anti-caking agents that make the sauce grainy and watery. Grab a box of sharp white cheddar and Gruyère, toss them in the freezer for 10 minutes to firm up, then grate them yourself. The texture difference is night and day—no clumps, no weird aftertaste.
- Don’t Overmix the Sauce: Once you melt the butter and add the cream cheese, stir just until smooth. Lumps of cheese will melt into creaminess, but overworking it turns the sauce thin and gluey. I used to blend it like soup—now I leave it slightly uneven, and the result is richer and more cohesive.
- Bake Covered First: Tent the baking dish with foil for the first 20 minutes. This traps steam and ensures the mac absorbs the cheese sauce evenly instead of drying out. After that, uncover for the last 5-10 minutes to get a golden crust—just don’t skip the foil step unless you want a sad, dry top.
Wine and beer pairings for old fashioned baked mac n cheese
Rich Red Wine
Mac and cheese’s creamy, cheesy richness pairs beautifully with full-bodied reds that stand up to the dish’s intensity. I always reach for a Cabernet Sauvignon from Napa Valley—its dark fruit and earthy notes complement the sharp cheddar and Gruyère.
A Syrah from Washington State also works wonderfully, with its spicy pepper and blackberry flavors cutting through the richness. Serve slightly chilled to let the wine’s acidity refresh your palate between bites. 🍷
Crisp White Wine
For those who prefer whites, a Chardonnay with noticeable oak (like a California Montelena) balances the dish’s creaminess without overpowering it. The wine’s buttery notes mirror the mac’s texture, while its acidity prevents a heavy feeling.
Alternatively, a Sauvignon Blanc from New Zealand offers bright citrus and herbal notes that cleanse the palate beautifully. Avoid overly oaky whites—they’ll clash with the dish’s delicate cheese flavors.
Malty Amber Ales
Beer lovers will adore a Belgian-style amber ale like Allagash White or New Belgium Fat Tire. The malt sweetness and subtle caramel notes harmonize with the mac’s cheesy depth, while the hop bitterness provides a refreshing contrast.
For a bolder option, try a German Dunkelweizen—its dark malt and banana esters elevate the dish’s richness. Serve the beer slightly cooler than room temperature for the best balance. 🍺
Light Lager Pairing
A crisp Mexican lager like Modelo Especial or Pacifico offers a refreshing, low-alcohol option that won’t overwhelm the mac’s flavors. The beer’s clean finish and subtle toasted notes let the dish shine without competition.
This pairing works especially well for casual gatherings where you want a crowd-pleasing, easy-drinking option that complements rather than distracts from the main event.
Dessert Wine Option
For a truly indulgent experience, pair your mac and cheese with a tawny Port or Moscato d’Asti. The wine’s sweetness and nutty undertones enhance the dish’s cheesy richness, creating a dessert-like finish.
This unexpected pairing is perfect for holiday feasts or when you want to elevate a comforting meal into something special. Serve the wine slightly chilled to highlight its fruity notes.
Nutrition facts
Frequently asked questions
Why does my baked mac and cheese turn out gummy instead of creamy?
Overmixing the cheese sauce is the usual culprit—it creates gluten strands that make the texture gummy. Always melt the cheese off the heat, then stir just until smooth. Also, ensure your pasta is al dente (not mushy) and drain it well before combining. The sauce should coat the back of a spoon but still be pourable.
Can I make this recipe ahead of time for a potluck?
Assemble the dish in the baking dish up to 24 hours ahead and refrigerate uncovered. The flavors deepen overnight. When ready to bake, add 5-10 extra minutes at 375°F (190°C) to crisp the topping. For longer storage (up to 3 months), freeze the assembled dish before baking.
What’s the secret to getting those perfect cheese swirls?
The swirls come from dragging a rubber spatula through the cheese mixture before baking. Transfer the pasta-cheese combo to the baking dish, then create circular patterns in the top layer—this creates air pockets that expand beautifully during baking. For extra drama, chill the assembled dish for 30 minutes before baking.
Can I substitute Gruyère with another cheese?
Yes! For a milder flavor, use Fontina or Emmental (1:1 ratio). For extra richness, swap in Parmesan (but limit to ½ cup) or Jarlsberg for a buttery note. Avoid pre-shredded cheeses—they contain anti-caking agents that prevent proper melting. Always shred fresh for the best texture.
How do I fix a soggy breadcrumb topping?
Prevent sogginess by pressing the breadcrumbs firmly onto the cheese before baking. If it happens, broil for 1-2 minutes (watch closely!) to crisp it up. For extra insurance, toast the breadcrumbs in a dry pan for 2-3 minutes before mixing with oil. This removes moisture and ensures maximum crunch.