Breakfast & Brunch
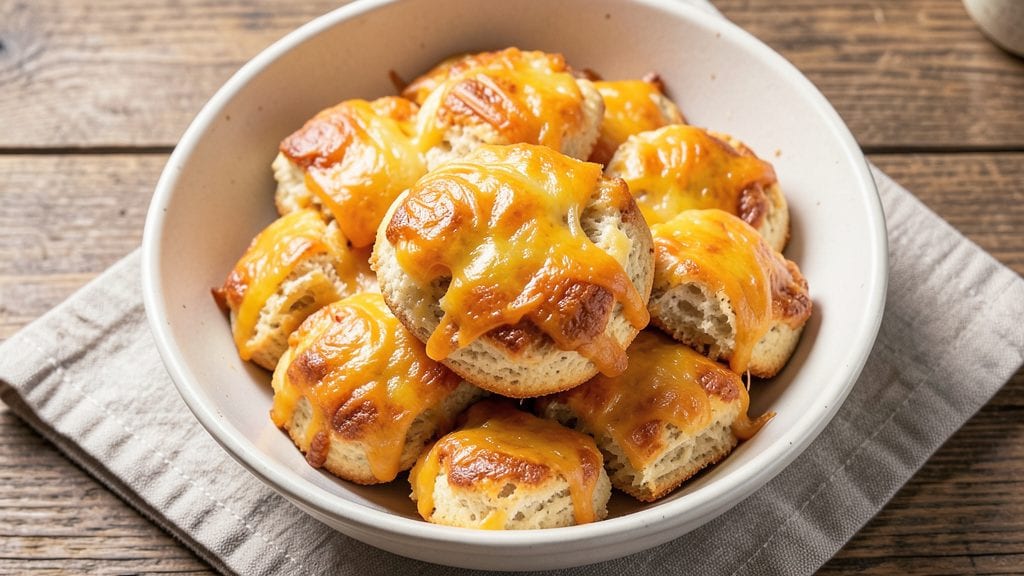
This Bisquick cheese biscuit recipe delivers the perfect balance of flaky layers and cheesy pull-apart magic in just 15 minutes of active time. The secret lies in a precise mix of Bisquick, shredded cheddar, and cold butter that creates a golden crust while keeping the inside tender and rich.
I've perfected this method over countless weekend breakfasts, and it never fails to impress—even with picky eaters.
The beauty of this recipe is its simplicity: 5 ingredients, one bowl, and 12 minutes in the oven. The cheese melts just enough to create pockets of gooey goodness while maintaining that signature Bisquick texture.
Unlike many recipes that require advanced techniques, this version relies on proper ingredient ratios and baking temperature to achieve professional results every time.
By the time these biscuits emerge from the oven, you'll have a batch of golden-brown, buttery biscuits with crisp edges and a tender interior that practically dissolves on your tongue. The pull-apart magic happens when the cheese melts just enough to bind the layers without making them dense.
Serve warm with honey butter, gravy, or as a side to any breakfast favorite.
Perfect for weekend brunches, quick weeknight meals, or as a base for open-faced sandwiches. The recipe scales easily for crowds, and leftovers reheat beautifully. Here's everything you need to create these foolproof biscuits that taste like they came from a Southern kitchen.
Ingredients for bisquick cheese biscuit
Five essential ingredients transform into golden, cheesy biscuits with crisp crusts and tender centers in minutes.
| Ingredient | Amount | Notes |
|---|---|---|
| Bisquick Original Mix 🍞 | 2 cups | Standard baking mix, not low-fat |
| Shredded Sharp Cheddar Cheese 🧀 | 1 cup | Freshly shredded, not pre-shredded |
| Unsalted Butter 🧈 | ½ cup | Cold and cubed, not melted |
| Whole Milk 🥛 | ¼ cup | Room temperature, full-fat |
| Diamond Crystal Kosher Salt 🧂 | 1 tsp | Fine grain for even distribution |
The Bisquick is non-negotiable—standard baking mix delivers the perfect texture, while low-fat versions compromise flakiness. Sharp cheddar is key for that signature pull-apart magic; pre-shredded cheese contains anti-caking agents that prevent proper melting. For the butter, cold cubes create steam pockets for flaky layers—never use melted. Most grocery stores carry Bisquick in the baking aisle, but Southern Living's recipe uses the original mix exclusively. The milk should be full-fat for richness; skim versions yield dry biscuits. If you're in a pinch, buttermilk works too but reduces tenderness slightly.
No sharp cheddar? Medium cheddar or Monterey Jack softens the flavor but maintains meltability. Substitute the milk with Greek yogurt for extra protein, though texture may vary. The butter can be swapped for European-style butter (like Plugrá) for deeper flavor, but keep it cold. For a vegetarian option, use dairy-free butter and ensure the cheese is plant-based. The salt is crucial—Diamond Crystal dissolves more evenly than table salt, but adjust to taste if using another brand. Pre-shredded cheese? Shred your own—it melts infinitely better.
Store any leftovers in an airtight container for up to 3 days at room temperature, though they're best enjoyed fresh. For longer storage, freeze portions for up to 3 months—thaw at room temperature before reheating. The biscuits reheat beautifully in a 350°F oven for 5-7 minutes or wrapped in foil in the microwave for 20 seconds. To save time, prepare the dough ahead and refrigerate for up to 24 hours before baking. The cheese will melt more dramatically straight from the fridge, creating extra gooey pockets.
Why You'll Love This Recipe
- Five-Ingredient Magic: I swear by this combo—Bisquick, sharp cheddar, cold butter, milk, and a pinch of salt. That’s it. No yeast, no kneading, no waiting. Just mix, fold, bake, and boom—flaky layers with melty cheese in every bite.
- No-Fuss Weeknight Win: Between us, I’ve burned biscuits before. But this? Even my sleepy self can nail it. The dough comes together in minutes, and the oven does the rest while I pour coffee. (Yes, even on a Tuesday night.)
- Breakfast or Brunch Star: Serve them warm with honey butter for breakfast, or pile them high with gravy for Sunday supper. They’re the unsung MVP of any meal—no one ever says no when they’re on the table.
- Leftovers? More Like Second Helpings: They crisp up perfectly the next day—toss them in the toaster or air fryer for a quick snack. Honestly, I’ve reheated mine three times and still crave them. That’s the mark of a winner.
Step-by-step instructions for Bisquick cheese biscuits
Here’s the method for achieving tender, flaky biscuits with a golden crust and that signature pull-apart magic.
Cut the Cold Butter into the Bisquick Mix
Place the 2 cups Bisquick Original Mix in a large bowl. Add the 0.5 cup unsalted butter, cut into ¼-inch cubes—cold butter is essential for flaky layers. Use a pastry cutter or two forks to work the butter into the Bisquick until you achieve a coarse crumb texture with pea-sized butter pieces scattered throughout.
This step ensures the biscuits develop those signature flaky layers. Overworking the dough will develop gluten and make the biscuits tough, so stop as soon as the butter is evenly distributed. The mixture should resemble coarse sand with visible butter pieces.
Add Cheese, Milk, and Salt for Moisture and Flavor
In a separate small bowl, whisk together the 0.25 cup whole milk and 1 tsp Diamond Crystal kosher salt until fully dissolved. Sprinkle the 1 cup freshly shredded sharp cheddar cheese over the Bisquick-butter mixture, then pour the milk-salt mixture over the top. Using a fork or rubber spatula, gently fold everything together until just combined—avoid overmixing.
The cheese adds richness and moisture, while the milk creates a tender crumb. The salt enhances the cheese flavor and balances the sweetness of the Bisquick. The dough will be slightly sticky but should hold together when pressed. If it feels too wet, add 1 tablespoon more Bisquick to bind it.
Shape and Stack the Biscuit Dough
Turn the dough out onto a lightly floured surface and gently pat it into a 1-inch-thick rectangle. Using a 2½-inch round biscuit cutter, press straight down to cut out biscuits—no twisting or rotating, as this tightens the gluten. Re-flour the surface and cutter as needed to prevent sticking. You should yield 4 biscuits from this dough.
For extra flakiness, stack the cut biscuits on top of each other on the floured surface, then press down firmly. This creates layers that separate beautifully when baked. Place the stacked biscuits back on the cutting board and cut through all layers to create 4 individual biscuits with clean, even tops.
Bake Until Golden and Pull-Apart Perfect
Preheat your oven to 425°F and place a baking sheet inside to heat for 5 minutes. Arrange the biscuits on the hot baking sheet, spacing them 1 inch apart—they’ll expand. Bake for 12-15 minutes until the tops are deep golden brown and the edges are set. The biscuits should pull apart easily when gently tugged.
Do not overbake—they’ll continue cooking slightly as they cool. If the tops brown too quickly, tent loosely with foil for the last 2-3 minutes of baking. Serve warm with honey butter, gravy, or your favorite breakfast spread for that classic Southern biscuit experience.
Pro Tips For Making Bisquick Cheese Biscuit
- CHILL THE DOUGH: I used to rush straight to baking, but letting the dough rest in the fridge for 10-15 minutes before cutting makes all the difference—it keeps the biscuits from spreading into flat pancakes. (Yes, even if you're impatient like me.)
- GRATE YOUR OWN CHEESE: Store-bought shredded cheese gets gummy when it melts. Save 5 minutes by grating your own sharp cheddar—it drains better and stays crisp, not clumpy. (Your biscuits will thank you.)
- PAT THE BUTTER THIN: Don’t just melt butter and pour it in. Cut cold butter into tiny cubes and pat them into the Bisquick mix until it looks like wet sand—this creates flaky layers that no shortcut can replace.
- USE A HOT PAN: Skip the preheating step and drop your biscuits into a sizzling cast-iron skillet. The initial shock of heat guarantees a golden crust, not a sad, pale bottom. (Your future self will thank you.)
Make-ahead tips for this recipe
Prep Ahead Dough
Mix the dough up to 24 hours in advance and store it in an airtight container in the refrigerator. The cold temperature enhances the cheese's meltability, creating extra gooey pockets when baked.
I like to shape the dough the night before—just press it into a rectangle, wrap tightly in plastic, and refrigerate. When ready to bake, let it sit at room temperature for 10 minutes before cutting. 💫
Freeze for Later
Shape the biscuits, then place them on a parchment-lined tray. Freeze until solid (1 hour), then transfer to a ziplock bag or airtight container. When ready to bake, remove biscuits directly from the freezer and place them on a cold baking sheet.
Add 1-2 minutes to the baking time—14-17 minutes total—since they'll need to thaw slightly. 🧊
Batch Baking
Double the recipe for parties or meal prep, but bake in batches. Arrange biscuits 1 inch apart on two separate baking sheets to prevent overcrowding. Rotate the pans halfway through baking for even browning.
I use this technique for Sunday brunches—bake a full batch, then reheat portions in a 350°F oven for 5 minutes when needed. 🍽️
Reheat Like a Pro
For best results, reheat biscuits wrapped in foil in a 350°F oven for 5-7 minutes—this restores their flaky texture. Microwave reheating works too: wrap one biscuit in a damp paper towel and heat on 50% power for 20 seconds.
Avoid the microwave's high-power setting, which dries out the cheese. 🔥
Make-Ahead Serving
Prepare the dough ahead, then bake fresh biscuits as needed. Store shaped biscuits (unbaked) in the fridge for 2 days or freeze for 3 months. I use this strategy for holiday gatherings—just pull out what I need and bake.
For a quick breakfast, bake a single biscuit straight from the fridge, adding 1 extra minute to the baking time. 💡
Cheese Melting Hack
For extra gooey biscuits, sprinkle 1 tbsp grated Parmesan over the shaped dough before baking. The Parmesan adds umami depth and melts faster than cheddar, creating pockets of liquid cheese. I discovered this trick when I ran out of sharp cheddar—it became my new favorite variation! 🧀
Nutrition facts
Frequently asked questions
Why do my cheese biscuits turn out dense instead of flaky?
Overmixing the dough develops gluten, which makes biscuits tough. Work the butter into the Bisquick just until pea-sized pieces remain, then fold in the wet ingredients gently. Also, ensure your butter is cold—melting it first destroys the steam pockets needed for flakiness.
Can I use pre-shredded cheese in this recipe?
Pre-shredded cheese contains anti-caking agents that prevent proper melting, resulting in dry biscuits. Always shred your own sharp cheddar for that signature gooey pull-apart texture. If you must use pre-shredded, reduce it by 2 tablespoons to compensate for excess moisture.
How do I make these biscuits ahead for a brunch?
Prepare the dough up to 24 hours ahead and refrigerate it in an airtight container. Shape the biscuits the night before, then freeze them on a tray for 1 hour. Store in a ziplock bag for up to 3 months. Bake straight from frozen, adding 2-3 minutes to the 12-15 minute time.
What's the best way to reheat leftover cheese biscuits?
Wrap biscuits in foil and reheat at 350°F for 5-7 minutes to restore flakiness. For microwave reheating, wrap one biscuit in a damp paper towel and heat on 50% power for 20 seconds. Avoid high-power settings—they dry out the cheese and make biscuits rubbery.
Can I substitute buttermilk for the whole milk in this recipe?
Yes, buttermilk adds tanginess and works well for texture. Use ¼ cup buttermilk instead of whole milk, but expect slightly less richness in the final product. The biscuits will still be tender, though the flavor profile shifts toward classic buttermilk biscuit notes.